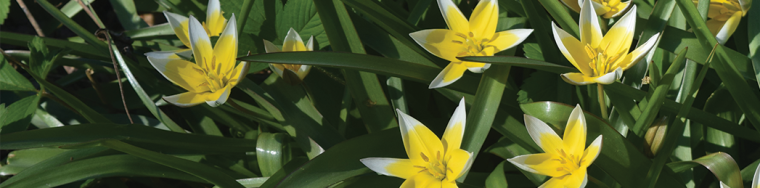
Again with the Tulips in Containers
Monday was a holiday, and I spent it planting 160 Tulips into 11 containers. Plus a 12th container I planted with ‘City of Haarlem’ Hyacinths (Hyacinthus orientalis).

There seems to be a fair amount of interest in planting Tulips in containers, so I’m doing this post even though I did a very similar one last year.
So why would anybody want to do this? For me, there are three main reasons.
First, I find it easier to work with hybrid tulips in containers rather than in beds and borders. The bulbs are relatively large and sometimes short-lived and the post-bloom foliage gets in the way. For beds and borders I prefer smaller bulbs like Grape Hyacinth (Muscari), Snowdrops (Galanthus), and Species Tulips.

Second, you can move your tulips in containers to wherever your heart desires – for example, to create a welcoming splash of color for your front door.
And last, this approach allows me to indulge my Tulip lust. There are 3,000 varieties of tulips out there, how can I be happy stuck forever with the same measly 10 or 12? I treat my container tulips as annuals, they go on the compost pile after blooming. Then I can order whatever I fancy for next year.

Planting tulips in containers is not complicated, but it is a bit of work. Of course, I had to start with pulling out all the summer annuals. And let me say, if you want to plant Mexican Petunia (Ruellia brittonniana) in containers, be aware that they are way easier to plant than they are to pull out. You’ve been warned. Then there are the following steps:
- Dump most of the planting mix into a bucket. You leave the container mix at the level where you want to plant your tulips. I generally plant the bulbs at least 8″ deep. But before planting I refresh the mix with a couple of handfuls of compost.
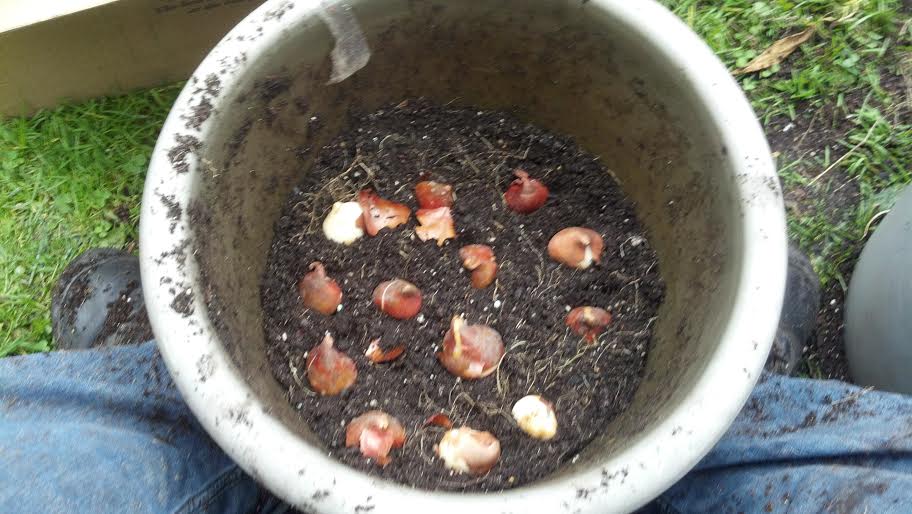
- Set the Tulip bulbs into the container. I plant them pretty close together – just an inch or two apart. Actually, they get closer together as the number of remaining containers dwindles.
- Fill the remainder of the container with the planting mix. I like to mix in another handful of compost at this point.
Now the question is where to leave the planted containers for the winter. You need a place that gets cold but not brutally cold. Year before last I left them in the garage, then last year I buried them in the Cuttings and Edibles Bed. You just have to bury them so that their tops are level with the ground. I’m going with burying again this year, though I didn’t get around to it on Monday.

Either way, it’s smart to put something on the containers to deter critters. I had leftover bits of hardware cloth and chicken wire that I secured with bricks.
In past years I’ve put a mix of early, mid-season, and late tulips in each container. This year the containers were a mix of either only early, early and mid, mid and late, or only late season bulbs.
Want to know what kind of tulips I planted? Sure you do!
- ‘Annie Schilder’: fragrant, orange, mid-season.
- ‘Ballerina’: lily-flowering, orange-scarlet, late.
- ‘Blushing Lady’: yellow-rose, late.
- ‘Couleur Cardinal’: fragrant, red-plum, early.
- ‘Early Harvest’: orange-scarlet, very early.
- ‘Elegant Lady’: lily-flowering, yellow-rose, late.
- ‘Keizerskroon’: fragrant, red-yellow, early.
- ‘Kingsblood’: deep red, late.
- ‘King’s Orange’: red-orange, mid.
- ‘Princess Irene’: fragrant, orange-purple, early.
- ‘Salmon Pearl’: fragrant, pink-yellow, mid.

You could say I’m not putting a big emphasis on subtle colors here. These will be tulips to wake you up in the morning. I am emphasizing fragrant tulips for the first time, something I’ve ignored in the past.
Of the 11 varieties here, eight are new to my garden.
You could make a pretty good case that this approach is expensive and wasteful. I think of it as my version of doing an elaborate Christmas lights display or Fourth of July Fireworks.
Already I can’t wait until Spring.


I’m waiting for an order of 35 fragrant peony tulips but 160 is truly impressive! That will be fabulous come spring! Mine all go into pots, too. Feeling the urge to run out and buy 100 more. :o)
You can never go wrong by buying more tulips.
Brilliant, well done, you! Those tulips will be spectacular!
Thanks!
1) I’ve always felt bad that we fell short with Christmas decorations, so this is a big relief to me.
2) If I’d taken the photos, there wouldn’t be a car tire in one of them.
3) These tulips are so wonderful in the spring.
We’re still going to fall short with Christmas decorations.
I bet you will be glad you made the expense when you see them in bloom next spring. I assume you will be sharing that view with us.
Oh yes, I always share. And I never apologize for spending money on plants.
Those tulips are fabulous when in bloom. =)
Yes, they are!
Wow, that’s a lot of bulbs and a lot of containers, but well worth it in the spring! And what a great idea to put a brick on top of the barrier! I am going to do that on top of the chicken wire on my measly one container of bulbs right now.
I was thinking I could also use little sticks to hold the chicken wire in place.
I did tulip/hyacinth combo containers all the time when we lived in Massachusetts. Such a great look when placed in groupings up the front stairs to the porch (we had a very wide set of 3 cement steps and the blooming pots really dressed things up! )
FYI I miss tulips terribly!
Another reason I couldn’t live in Florida. Though I recognize there are compensations.
Sounds wonderful! I am planning to do something similar this year, putting lots of them in pots. I must say that tulips are my favorite flower.
They are one of my favorites, but then I have so many favorites. By the way, not sure if you have a blog, but if so there is no link back to it.
I just ordered some Irene tulips, along with “Orange Princess” which are meant to complement each other. A lot of hard work ( good luck with digging those holes) but well worth the display in spring. Look forward to seeing your photos of them sprouting! 😉
I’m planning to start on digging the holes tomorrow.
I think you are right to treat tulips as annuals and they are still worth every penny for the pleasure they bring. I would usually plant bulbs in layers in pot so giving a longer period of interest, or plant the top with violas for interest during the winter. Forget-me-nots are often planted with tulips to give a frothy under-story; I’m not that fond of them myself.
This year I underplanted the tulips with sweet alyssum. I might like Forget-Me-Nots that way.
Quite a bit of organization, work and money BUT you should have a big show of color while the rest of us are enjoying green. 🙂
That’s what I’m counting on.
I love that you go for the big splash! Spring is worthy of celebration and I plan to join the revelry soon.
Why make a splash at all if it isn’t big?
Jason, you’re getting me excited for Spring. Good work getting all those bulbs planted. I bought a few hyacinths to plant this fall, but haven’t tried tulip in many years. Maybe I should try your container approach.
Give it a try where you live you could probably leave them in an unheated garage.
You will have a fabulous display next spring. I cannot wait to see the photos =)
Me too!
OK, you’ve convinced me to try Tulips again! I have such a rabbit problem, that I’ve largely given up on them in favor of Daffodils, which the rabbits don’t touch. Wow, you know how to do container bulb plantings! So, I guess maybe I’ll put mine in the garage–that seems like the easiest method, except for the hauling out in spring part. But that would be a joy, right? Thanks for the great info!
You’re welcome! Is you’re garage at all heated?
The garage is not heated. Is that good or bad? 😉
So if it is just as cold in the garage as outside you will want to wrap some insulation around your containers.
Since your tulips aren’t really being “forced” in the traditional sense I think they might bloom in later years as they normally would but, as you say, how many tulips do you need?
I think they make a great display on your steps.
Thanks.
I love the anticipation that comes with planting spring-flowering bulbs…and, as you mention, because you’re putting these up in containers, you can change everything annually and keep trying new ones. That’s even more exciting! Looking forward to seeing your photos in 2015!
Though it makes it harder to wait for spring.
You’ve been busy! We need to think of something better than just burying the pots… so much work!
It is a lot of work. I’ve got to start on it tomorrow.
I’m pleased to hear you are prepared for spring, I can’t wait either. I take a chance and leave my tulips in the ground…..I hope my queen of the night come up again.xxx
Your tulips in the ground are probably safe.
Well done getting them all planted. You must be pleased. It’ s a funny thing with tulips that no matter how many you buy, in the Spring you always wish you had bought more.
I leave mine in the ground but they gradually diminish and fade away after 2 or 3 years. The Darwin hybrids are good though, they actually increase.
I think it is a good idea planting them in pots for maximum impact. Much nicer than a Christmas lights display, which in my opinion always looks tacky. Tulips always look refined, elegant and very tasteful.
That’s true, you always wish for more!
How informative. Thanks for this. Burying the pots is a bit onerous for us right now.I was wondering if I put some styrofoam in the containers – would that prevent the pots from cracking?
I wouldn’t bother with the styrofoam. Do you have some place that gets cold, but not brutally cold, say an adjoining garage? Needs to be under 40 F. An alternative is to wrap the containers in insulation like bubble wrap.
I really hope to do this maybe with some tulips I dug up out of a bed I am reusing. A small pot perhaps left in the garage…yes I think so…so thanks for this post as it gets me experimenting with this idea again!!
Good luck!
Hi Jason, I remember your tulip pots from last year and they looked stunning in the spring sunshine. I hope next years display is just as good if not even better. I was tempted to plant tulips in the trugs that line the front of the house but I went for winter bedding instead (I guess I actually could have done both but then costs mount). Looking forward to seeing your tulips next spring!
I am also!
This is such a great idea, Jason! Last year I experimented for the first time with planting just one pot of tulips. But I didn’t realize the pot didn’t have drainage holes drilled out, and the bulbs all “drowned” in a heavy spring rain. I set my container on a back porch and wrapped it with bubble wrap, but I like the idea of burying the pot instead.
Yeah, why is it that they don’t put drainage holes in the containers?
I really enjoyed this post – especially since I was just taking apart my outdoor containers for storing root bases and rhizomes for the winter here in CT, and then a thought occurred, this is a great way to reuse my pots for the winter months, esp since the soil mix is still good. Thanks for sharing your knowledge! Cathy T
And I just saw your note about drainage holes – if only one pot maker would do this appropriately – they would make millions! NO more drilling!! Cath
I still don’t understand why they don’t do that – at least sell containers with and without drainage holes.